Lesson 1: The Game Loop
Every game you have ever played, from Pong to a sprawling open world, is one short loop that runs many times a second. In this lesson you install pygame-ce, open your first game window, and make a ball bounce at the same speed on every computer.
🎯 Learning Objectives
By the end of this lesson, you will be able to:
- Install pygame-ce and confirm it works with a short setup check.
- Build a game loop that handles events, updates, draws and shows a frame, over and over.
- Explain what
clock.tick()does and turn its return value intodt, the frame time in seconds. - Move an object in pixels per second so it runs at the same speed at 30, 60 or 144 frames per second.
- Debug the three classic loop problems: a frozen window, smeared trails and a ball stuck in a wall.
Project: a Bouncing Ball Screensaver that shows its frame rate and keeps the same speed at any frame rate.
In This Lesson
🛠️ Set Up pygame-ce
This course uses pygame-ce (pygame Community Edition), an actively maintained fork of the classic pygame library. You install it under the name pygame-ce, but your code still says import pygame, so almost every pygame tutorial on the web works with it too.
Open a terminal (Command Prompt or PowerShell on Windows, Terminal on macOS or Linux) and run the line for your system:
# Windows
py -m pip install pygame-ce

# macOS and Linux
python3 -m pip install pygame-ce
If you installed the original pygame for an older project, remove it first with python3 -m pip uninstall pygame (py -m pip uninstall pygame on Windows). The two packages share the name pygame inside Python, so having both installed causes confusing errors.
Now save this setup check as setup_check.py and run it:
import sys

import pygame

print("Python", sys.version.split()[0])
print("pygame", pygame.version.ver)
if getattr(pygame, "IS_CE", False):
    print("You have pygame-ce. You're ready!")
else:
    print("This is the original pygame, not pygame-ce.")
    print("Run: pip uninstall pygame   then: pip install pygame-ce")
The last line should read You have pygame-ce. You're ready!. pygame-ce also prints a one-line greeting with its version when it is imported; that is normal.
🎬 What Is a Game Loop?
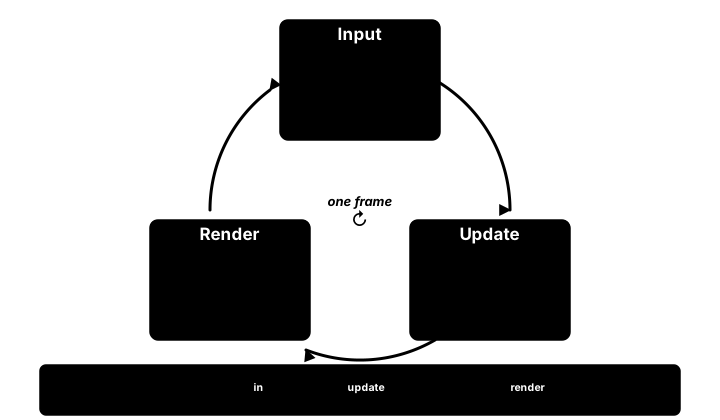
A movie looks like smooth motion, but it is really a series of still pictures, usually 24 every second. Your brain blends them into movement. A game does the same thing with one big difference: it draws each picture on the spot, based on what you are doing right now. Each picture is called a frame, and the code that makes frames over and over is the game loop.
Every pass through the loop does the same three jobs, in the same order:
- Handle events. Ask the operating system what happened since the last frame: key presses, mouse clicks, the window's close button.
- Update. Change the game's state: move the player, run the enemies, check collisions, add to the score.
- Draw. Paint the current state onto the screen, then show the finished picture.
Then the loop waits a moment, so it does not run faster than it needs to, and starts again.
💡 Why this matters
This loop is the skeleton of every game you will write in this course, from this lesson's bouncing ball to your capstone arcade game. Big engines hide the loop from you, but it is still there, doing the same three jobs. Once you can see the loop, you know where every new piece of code belongs.
🪟 Your First Window
Here is a complete pygame-ce program. Type it in (typing it teaches your fingers more than pasting does), save it as first_window.py, and run it. A dark window with a yellow circle should appear, and the close button should close it.
import pygame

pygame.init()
screen = pygame.display.set_mode((800, 600))
pygame.display.set_caption("My First Game Loop")
clock = pygame.time.Clock()

running = True
while running:
    clock.tick(60)                          # at most 60 frames per second

    # 1. Handle events
    for event in pygame.event.get():
        if event.type == pygame.QUIT:       # the window's close button
            running = False

    # 2. Update (nothing moves yet)

    # 3. Draw
    screen.fill((30, 30, 40))               # erase the last frame
    pygame.draw.circle(screen, (255, 200, 60), (400, 300), 40)
    pygame.display.flip()                   # show the finished frame

pygame.quit()
Read it from top to bottom:
pygame.init()starts pygame's parts (display, fonts, sound). Call it once, before anything else.pygame.display.set_mode((800, 600))opens an 800 × 600 pixel window and returnsscreen, the Surface (a picture in memory) you draw on.pygame.time.Clock()makes a clock that paces the loop. You will meet it properly in the next section.while running:is the game loop. It keeps going until something setsrunning = False.pygame.event.get()hands you every event that arrived since the last frame and empties the queue. Calling it every frame also tells the operating system your program is alive. The pygame docs warn that if you stop reading events for too long, the system may decide your program has locked up; that is when you see "Not Responding".screen.fill(color)paints the whole Surface one color, wiping out the previous frame. Colors are(red, green, blue)tuples, each from 0 to 255.pygame.display.flip()shows the finished Surface in the window all at once, so players never see a half-drawn frame.pygame.quit()runs after the loop ends and shuts pygame down cleanly.
🔮 Predict, then run
Before you try it, predict: what will you see if you put a # in front of the screen.fill(...) line? Now comment it out and run the program. (The circle does not move yet, so the difference is subtle here. Remember your prediction: in the exercise, the moving ball will make the answer obvious.) Then take the # back out.
✅ Growth Mindset: Your First Window Might Not Open, Yet
If you get an error instead of a window, you are in very good company: almost everyone's first pygame program fails for a small reason, such as a missing parenthesis, Pygame with a capital P, or pygame-ce installed for a different Python than the one running your file. An error message is not a grade; it is a clue. Read the last line of the traceback first, then the line number it points to, and compare that line to the example character by character. Each error you fix now is one you will spot in seconds next month.
⏱️ Frames, FPS and clock.tick()
FPS (frames per second) is how many times the loop runs each second. At 60 FPS, each frame gets 1000 ÷ 60 ≈ 16.7 milliseconds to handle events, update and draw.
| Frame rate | Time per frame | Where you see it |
|---|---|---|
| 30 FPS | 33.3 ms | Many console and mobile games |
| 60 FPS | 16.7 ms | The usual target for PC and action games |
| 144 FPS | 6.9 ms | High-refresh gaming monitors |
clock.tick(60) does two jobs:
- It caps the frame rate. If the frame finished early,
tickwaits for the rest of the 16.7 ms, so the loop runs at most 60 times a second. Without it, a simple loop runs as fast as the computer allows, keeping a CPU core busy drawing frames nobody can see. It is a cap, not a promise: if your frame takes 25 ms, you get 40 FPS. - It returns the time since the last
tick, in milliseconds, as a whole number. That number is the key to the next section.
Call tick exactly once per loop. We put it first in the loop, so the frame time is ready before the update step needs it. clock.get_fps() gives the average frame rate over the last few frames, which is handy for an on-screen FPS counter.
🏃 Delta Time: The Same Speed Everywhere
The obvious way to move something is to add a few pixels every frame:
x += 4 # 4 pixels every frame: 240 px/s at 60 FPS, but only 120 px/s at 30 FPSThat works on your computer and breaks on everyone else's. On a laptop that only manages 30 FPS, the game runs in slow motion; on a 144 FPS machine, it runs more than twice as fast. Try it in the demo below: switch between frame rates and watch the red ball.
The fix is to think in pixels per second instead of pixels per frame. Each frame, ask how much time has passed, and move that fraction of a second's distance. That time is called delta time, or dt:
dt = clock.tick(60) / 1000    # milliseconds to seconds: about 0.0167 at 60 FPS
x += speed * dt               # pixels per second × seconds = pixels
At 60 FPS, dt is about 0.0167, so a ball with speed = 240 moves 4 pixels a frame. At 30 FPS, dt is about 0.033 and it moves 8 pixels a frame. Either way it covers 240 pixels every second. In this course, dt is always in seconds, speeds are in pixels per second, and timers count seconds.
Here is a complete program that slides a square across the window using dt:
import pygame

pygame.init()
screen = pygame.display.set_mode((800, 200))
pygame.display.set_caption("Delta Time")
clock = pygame.time.Clock()

x = 0.0             # position in pixels (a float, so small steps add up)
speed = 240         # pixels per SECOND

running = True
while running:
    dt = clock.tick(60) / 1000          # seconds since the last frame
    for event in pygame.event.get():
        if event.type == pygame.QUIT:
            running = False

    x += speed * dt
    if x > 800:                         # off the right edge?
        x -= 840                        # come back in from the left

    screen.fill((17, 24, 39))
    pygame.draw.rect(screen, (74, 222, 128), (x, 80, 40, 40))
    pygame.display.flip()

pygame.quit()
Change clock.tick(60) to clock.tick(20) and run it again. The square moves in bigger, choppier steps, but it crosses the window in the same time. That is frame-rate independence.
Notice that x starts as 0.0, a float. A step of 4.0 pixels adds up exactly, and so does a step of 1.7. If you stored the position in whole numbers, those fractions would be thrown away every frame and slow objects would stall.
🧰 Common Loop Problems
Every game developer hits these. Learn the symptom and you will fix them in seconds.
| Symptom | Likely cause | Fix |
|---|---|---|
| Window says "Not Responding" or will not close | Events are not read every frame | Keep the for event in pygame.event.get() loop inside the while loop |
| Moving objects leave smeared trails | The last frame is never erased | Call screen.fill(...) before drawing |
| Window stays black | The frame is never shown | Call pygame.display.flip() after drawing |
| Fan spins up, game far too fast | No frame cap | Call clock.tick(60) once per loop |
| Speed differs between computers | Moving by pixels per frame | Move by speed * dt |
| Ball jitters or sticks along a wall | Flipping direction without moving it back inside | Push it back to the edge, then set the direction away from the wall |
The last row deserves a closer look, because you will need it in the exercise. With dt, a fast ball can end a frame partly inside the wall. If you only flip its speed (vx = -vx), it may still be inside next frame, flip back, and get stuck buzzing along the wall. The reliable bounce does two things: put the ball back at the edge, and point it away from the wall with abs():
if x + BALL_RADIUS > WIDTH:     # poking out of the right edge
    x = WIDTH - BALL_RADIUS     # 1. put it back at the edge
    vx = -abs(vx)               # 2. always head left, whatever vx was
🧭 A name you will hear: "fixed timestep"
The loop in this lesson is a variable timestep loop: each update uses the real time that passed, so dt changes a little from frame to frame. That is simple and works well for most 2D games.
Games with a lot of physics often use a fixed timestep instead: the update always advances the world by exactly the same small step (say 1/60 of a second) and runs zero, one or several updates per drawn frame to keep up with real time. That makes physics repeatable. Note that clock.tick(60) alone is not a fixed timestep: it caps the frame rate, but dt still varies. You don't need a fixed timestep yet; Going Further says where the series builds one.
✅ Growth Mindset: Bugs Are Clues, Not Verdicts
Every problem in that table is one that experienced developers still cause by accident; the difference is that they recognize the symptom. When your game misbehaves, don't rewrite everything. Change one thing, run it, and watch what changes. A smeared trail, a frozen window or a buzzing ball is the program telling you exactly which part of the loop to look at.
🏋️ Practice Exercise: Bouncing Ball Screensaver
Objective: make a ball bounce around the window forever, at the same speed at any frame rate, with the current FPS shown in the corner.
Time: about 30 minutes. Starter file: bouncing_ball_starter.py (your instructor has it). It opens the window and draws a ball that does not move yet. Its numbered comments match the steps below.
- Run the starter. You should see a still ball, and the close button should work. (≈ 2 min)
- Replace the starter's two lines,
clock.tick(FPS)anddt = 0.0, with one line that setsdtto the valueclock.tick(FPS)returns, divided by 1000. Calltickonly once per frame. (≈ 3 min) - In
move_ball(), addvx * dttoxandvy * dttoy. Run it: the ball drifts off the screen. (≈ 5 min) - Make it bounce off all four edges using the push-back-then-
abs()pattern from Common Loop Problems. (≈ 10 min) - Create a font once, before the loop, then draw
FPS: 60(fromclock.get_fps()) at the top left every frame. (≈ 5 min) - Change
FPSto 30, then to 144. Time how long the ball takes to cross the window. (≈ 5 min)
You are done when:
- the ball bounces off all four edges for as long as you watch, without sticking to a wall;
- the FPS label roughly matches your
FPSsetting; - the ball crosses the window in about the same time at 30 and at 144 FPS;
- closing the window prints a line like
Drew 1843 frames in 30.7 seconds.
💡 Hint
If the ball rockets off the screen instantly, dt is probably still in milliseconds: check the / 1000. For the bounce, write the right edge first (x + BALL_RADIUS > WIDTH), run it, and only then copy the pattern to the other three edges. For the left and top edges the ball must head in the positive direction, so use abs(vx) without the minus sign.
✅ Example Solution
If your instructor hands you the lab file, you will see a few extra lines marked lab runtime near the top and and frame_budget() in the loop. They let the instructor's checker run the program automatically for a fixed number of frames; when you run it yourself they do nothing. You never need to write them.
"""Bouncing Ball Screensaver: Intro Lesson 1 practice exercise (solution).

A ball bounces around the window at the same speed at any frame rate,
and the current FPS is drawn in the corner. Close the window to quit.
"""
import pygame


WIDTH, HEIGHT = 800, 600
FPS = 60                        # try 30 and 144: the ball's speed should not change
BALL_RADIUS = 20
BG_COLOR = (20, 24, 36)
BALL_COLOR = (255, 107, 107)
TEXT_COLOR = (230, 230, 230)


def move_ball(x, y, vx, vy, dt):
    """Move the ball for one frame and bounce it off the window edges.

    vx and vy are speeds in pixels per SECOND and dt is in seconds.
    Returns the new (x, y, vx, vy).
    """
    x += vx * dt
    y += vy * dt

    # Bounce: push the ball back inside, then point it away from the wall.
    if x - BALL_RADIUS < 0:
        x = BALL_RADIUS
        vx = abs(vx)
    elif x + BALL_RADIUS > WIDTH:
        x = WIDTH - BALL_RADIUS
        vx = -abs(vx)
    if y - BALL_RADIUS < 0:
        y = BALL_RADIUS
        vy = abs(vy)
    elif y + BALL_RADIUS > HEIGHT:
        y = HEIGHT - BALL_RADIUS
        vy = -abs(vy)
    return x, y, vx, vy


def main():
    pygame.init()
    screen = pygame.display.set_mode((WIDTH, HEIGHT))
    pygame.display.set_caption("Bouncing Ball Screensaver")
    clock = pygame.time.Clock()
    font = pygame.font.Font(None, 32)       # create fonts once, before the loop

    x, y = WIDTH / 2, HEIGHT / 2
    vx, vy = 240.0, 180.0                   # pixels per second
    frames = 0
    seconds = 0.0

    running = True
    while running:
        dt = clock.tick(FPS) / 1000         # seconds since the last frame

        # 1. Handle events
        for event in pygame.event.get():
            if event.type == pygame.QUIT:
                running = False

        # 2. Update
        x, y, vx, vy = move_ball(x, y, vx, vy, dt)
        frames += 1
        seconds += dt

        # 3. Draw
        screen.fill(BG_COLOR)
        pygame.draw.circle(screen, BALL_COLOR, (x, y), BALL_RADIUS)
        fps_text = font.render(f"FPS: {clock.get_fps():.0f}", True, TEXT_COLOR)
        screen.blit(fps_text, (10, 10))
        pygame.display.flip()

    pygame.quit()
    print(f"Drew {frames} frames in {seconds:.1f} seconds.")


if __name__ == "__main__":
    main()
📓 Learning Journal
Take five minutes to write in your learning journal (a notebook or a plain text file works). Jot down:
- Key concepts you learned today
- Techniques that clicked (and the ones that haven't, yet)
- Questions or confusion to bring to the next session
- Ideas to try in your own game
- Progress and feelings: how did this lesson go for you?
✍️ This lesson's prompts:
- Explain the three jobs of a game loop to someone who has never programmed, using a comparison from everyday life. Which job do you think is busiest in your favorite game?
- You watched the red ball slow down at a low frame rate. Describe a real game where moving by pixels per frame would be unfair to some players.
- What did you try first when something didn't work today? What would you try first next time?
📝 Summary
You installed pygame-ce and opened your first game window. Behind that window is the game loop: each frame it handles events, updates the game and draws a fresh picture, then waits so it does not run faster than it needs to. You learned that clock.tick() both caps the frame rate and reports how long the last frame took, and you used that time, dt, to move a ball in pixels per second, so it plays the same on a slow laptop and a fast gaming PC.
🎓 Key Takeaways
- Every game is a loop: handle events, update, draw, many times per second.
- Read events with
pygame.event.get()every frame, or the system may think your program has frozen. screen.fill()erases, drawing calls paint, andpygame.display.flip()shows the finished frame.clock.tick(60)caps the loop at 60 FPS and returns the milliseconds since the last tick; divide by 1000 to getdtin seconds.- Move by
speed * dtwith speeds in pixels per second, and keep positions as floats. - A reliable bounce puts the object back at the edge, then points it away from the wall.
🔭 Looking Ahead
Your loop draws one circle. In the next lesson, Drawing Shapes & Surfaces, you fill the frame with rectangles, lines, polygons and text, and learn how Surfaces let you build a picture once and draw it many times.
❓ Common Questions
Why pygame-ce instead of the original pygame?
pygame-ce is a community-maintained fork of pygame with frequent releases and extra features that this course uses later, such as pygame.FRect. Your code still says import pygame. Just don't install both packages at once; if the setup check says "original pygame", uninstall pygame and install pygame-ce.
Does clock.tick() go at the top or the bottom of the loop?
Either works, as long as it runs exactly once per loop. This course puts it first, so dt is ready before the update step. You will see both styles in other tutorials.
My FPS counter says 59 or 62, not 60. Is something wrong?
No. tick(60) is an upper limit, and the operating system's timers are not perfectly exact, so the measured rate wobbles a little. That wobble is exactly why you move by dt instead of assuming every frame is 1/60 of a second.
What happens if one frame takes a very long time?
On some systems, dragging or resizing the window pauses the loop, and the next dt can be half a second or more, so objects jump. A common guard is to cap it: dt = min(clock.tick(60) / 1000, 0.05). The bounce pattern in this lesson already keeps the ball inside the window even after a big jump.
Older examples end with sys.exit(). Do I need it?
Not when the loop is the last thing in your program: after pygame.quit() the script simply ends. sys.exit() is only needed if you want to stop the program immediately from somewhere in the middle.
Can my game run faster than 60 FPS?
Yes. Use clock.tick(144), or clock.tick() with no number for no cap at all. Because you move by dt, the game plays at the same speed either way; a higher frame rate just looks smoother and uses more of the computer's power.
🎯 Quick Quiz
Question 1: What can happen if your game loop never calls pygame.event.get()?
Question 2: What number does clock.tick(60) return?
Question 3: A ball moves at 200 pixels per second, and this frame's dt is 0.02. How far should it move this frame?
Question 4: You delete the screen.fill(...) line from the bouncing-ball program. What do you see?
Question 5: Why multiply speeds by dt instead of moving a fixed number of pixels each frame?
🌟 Going Further
- Two balls: add a second ball with its own position, speed and color. Give each ball its own
x, y, vx, vyand callmove_ball()for both. - Gravity: add
vy += 980 * dtbefore moving, so the ball falls and bounces like a real one. (980 pixels per second squared feels about right on screen.) - Slow motion: multiply
dtby 0.25 before using it. The whole game slows down smoothly, which is how many games do a slow-motion effect. - Read the docs: skim the pygame-ce pages for pygame.time (Clock), pygame.display and pygame.event. Find one function you haven't used yet.
- Coming up in Game Dev II: Intermediate: Velocity, Acceleration & Timesteps builds a true fixed-timestep loop for physics that plays out the same way every time.