Lesson 2: Drawing Shapes & Surfaces
Your game loop can already draw one circle; now you will paint whole scenes with rectangles, lines, polygons and text. Along the way you learn how Surfaces let you build a picture once and stamp it anywhere, which is how every sprite in this course will be drawn.
🎯 Learning Objectives
By the end of this lesson, you will be able to:
- Draw rectangles, circles, ellipses, lines and polygons with
pygame.draw, either filled or as outlines. - Place shapes using pygame's screen grid, where (0, 0) is the top-left corner and y grows downward.
- Describe colors as RGB tuples and keep calculated colors legal with a
clamp_color()helper. - Build a Surface once, including a see-through
SRCALPHASurface, and blit it as many times as you like. - Show text on screen with a font that is created once, before the game loop.
Project: a Sunset Scene: a house on a hill, drifting see-through clouds, and a sun that sets while the sky darkens.
In This Lesson
📐 The Screen Is a Grid
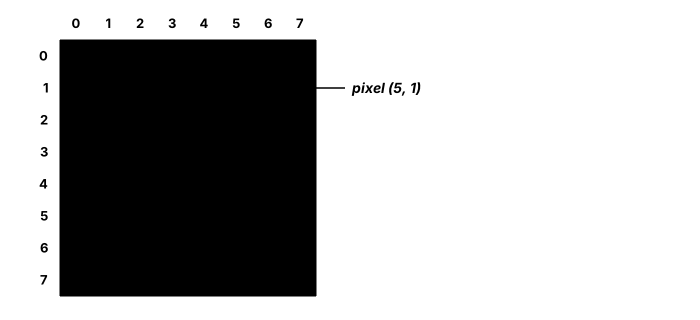
Think of the window as a sheet of graph paper where every square is one pixel. To draw anything you give pygame a pixel's address as (x, y):
- x counts pixels from the left edge, growing to the right.
- y counts pixels from the top edge, growing downward. This is the opposite of the graphs from math class, and it catches everyone at first.
- (0, 0) is the top-left corner. In an 800 × 600 window, x runs from 0 to 799 and y from 0 to 599, so
(800, 600)is just past the bottom-right corner.
🔮 Predict, then check
In an 800 × 600 window, where do these points land: (400, 300), (790, 10) and (10, 590)? Say "top-left", "center" and so on out loud, then check with the Shape Builder demo below: it labels the position of each new shape it draws. (Answers: the center, near the top-right corner, near the bottom-left corner.)
🎨 Colors and clamp_color()
A screen pixel mixes red, green and blue light. In pygame a color is a tuple of those three amounts, each a whole number from 0 (none) to 255 (full):
| Tuple | Color | Why |
|---|---|---|
(255, 0, 0) | Red | Full red, no green, no blue |
(255, 255, 0) | Yellow | Red and green light mix to yellow |
(255, 255, 255) | White | All three at full strength |
(0, 0, 0) | Black | No light at all |
(128, 128, 128) | Gray | Equal amounts of all three |
(135, 206, 235) | Sky blue | Mostly blue and green, some red |
Store the colors you use as named constants at the top of your program (SKY = (135, 206, 235)), so a later change happens in one place. pygame also knows several hundred color names: pygame.Color("tomato") is (255, 99, 71).
When a calculated color goes out of range
Games often calculate colors: a sky that darkens at sunset, a hit flash that fades, a health bar that turns from green to red. Math like that can easily produce a channel below 0 or above 255, and pygame refuses it:
seconds = 12
sky = (135 - 12 * seconds, 206 - 18 * seconds, 235 - 16 * seconds)   # (-9, -10, 43)
screen.fill(sky)   # ValueError: invalid color ... each element must be an integer in the range [0, 255]
The fix is a tiny helper that forces every channel into range and turns it into a whole number. You will use it for every color you calculate in this course:
def clamp_color(color):
    """Return color with every channel forced to a whole number from 0 to 255."""
    return tuple(max(0, min(255, int(channel))) for channel in color)


print(clamp_color((-9, -10, 43.8)))      # (0, 0, 43)
print(clamp_color((300, 128, 12)))       # (255, 128, 12)
Read it from the inside out: min(255, ...) caps a channel at 255, max(0, ...) lifts it to at least 0, and int() drops the fraction. The tuple(... for channel in color) part does that to each channel in turn, just like a for loop that builds a new tuple. It works for 4-channel colors too (see Surfaces below).
🔷 The Drawing Functions
Every function in pygame.draw follows the same pattern: where to draw (a Surface, usually screen), what color, then the shape's numbers, then an optional width.
| Function | Shape numbers | Example |
|---|---|---|
rect | (x, y, width, height), with (x, y) the top-left corner | pygame.draw.rect(screen, RED, (50, 60, 120, 80)) |
circle | center (x, y), then radius | pygame.draw.circle(screen, BLUE, (400, 300), 50) |
ellipse | the rectangle the oval fits inside | pygame.draw.ellipse(screen, PINK, (300, 350, 160, 80)) |
line | start (x, y), end (x, y), then thickness | pygame.draw.line(screen, WHITE, (0, 500), (800, 500), 3) |
polygon | a list of corner points, in order | pygame.draw.polygon(screen, GREEN, [(400, 100), (460, 200), (340, 200)]) |
The width argument decides filled or hollow. Leave it out (or pass 0) and the shape is filled; pass 3 and you get a 3-pixel outline drawn just inside the shape's edge. A line has no inside, so its width is simply its thickness. There is also pygame.draw.arc for part of an oval; its angles are given in radians, a unit for angles that this course comes back to later.
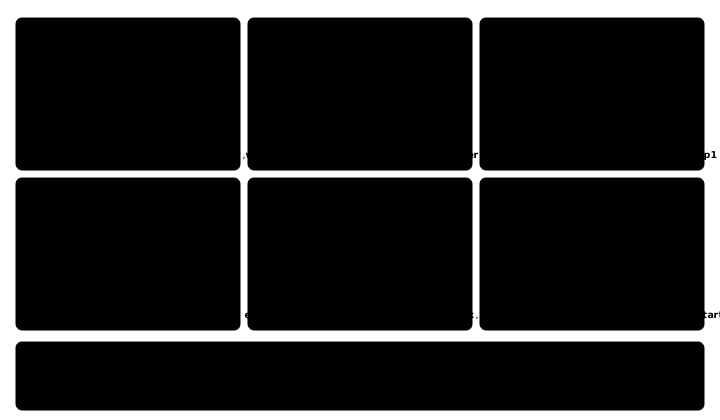
pygame.draw signatures. Positions are tinted teal, sizes amber, the line's end point blue and the arc's angles red. Every function takes the Surface and the color first.Try it: each button draws one random shape and prints the matching pygame.draw call with the same numbers. Switch between filled and outline mode, and notice that each new shape covers the ones drawn before it.
pygame.draw.polygon(...)
Here is a complete program that uses all five functions. Run it, then change one number at a time and predict what will move.
import pygame

pygame.init()
screen = pygame.display.set_mode((800, 600))
pygame.display.set_caption("Shape Gallery")
clock = pygame.time.Clock()

BACKGROUND = (20, 24, 36)
RED = (255, 107, 107)
GREEN = (74, 222, 128)
BLUE = (96, 165, 250)
YELLOW = (250, 204, 21)
PINK = (244, 114, 182)
WHITE = (240, 240, 240)

running = True
while running:
    clock.tick(60)
    for event in pygame.event.get():
        if event.type == pygame.QUIT:
            running = False

    screen.fill(BACKGROUND)

    # Rectangles: (x, y, width, height). The second one is a 4-pixel outline.
    pygame.draw.rect(screen, RED, (50, 60, 120, 80))
    pygame.draw.rect(screen, GREEN, (220, 60, 120, 80), 4)

    # Circles: center, radius. Then a 6-pixel ring.
    pygame.draw.circle(screen, BLUE, (470, 100), 45)
    pygame.draw.circle(screen, YELLOW, (640, 100), 45, 6)

    # An ellipse fills the rectangle you give it.
    pygame.draw.ellipse(screen, PINK, (50, 220, 200, 100))

    # A hexagon: six corner points, listed in order around the shape.
    hexagon = [(420, 210), (480, 245), (480, 315), (420, 350), (360, 315), (360, 245)]
    pygame.draw.polygon(screen, WHITE, hexagon, 3)

    # Lines: start, end, thickness. A little fan of them.
    for end_x in range(560, 761, 50):
        pygame.draw.line(screen, YELLOW, (660, 380), (end_x, 230), 2)

    # Draw order matters: the green bar is drawn last, so it sits on top.
    pygame.draw.rect(screen, BLUE, (100, 450, 300, 60))
    pygame.draw.rect(screen, GREEN, (250, 470, 300, 60))

    pygame.display.flip()

pygame.quit()
💡 Why this matters: draw order is layering
pygame has no idea that a hill is "in front of" the sun. It simply paints pixels in the order you call the functions, so whatever you draw later covers what is already there. Draw your scene back to front: sky, then far objects, then near objects, then the score on top. You will lean on this in the exercise to make the sun disappear behind a hill.
✅ Growth Mindset: Nobody Places Shapes Right the First Time
If your roof floats above the house or your sun hides off-screen, that is not a sign you are bad at this; it is how placing shapes works for everyone, including professional artists who tweak positions for hours. Use the habit that makes it quick: change one number, run, look, repeat. Sketch the scene on paper with a few coordinates written next to the corners, and remember that bigger y means lower on the screen. You don't have a feel for the grid yet; by the end of the exercise you will.
🧱 Surfaces: Build Once, Draw Many
The screen you draw on is a Surface: a rectangle of pixels in memory. You can make your own Surfaces too, draw on them once, and then copy them onto the screen as often as you like. Copying one Surface onto another is called blitting (from "block transfer"):
tree = pygame.Surface((60, 100))          # a new 60 x 100 picture (black to start)
pygame.draw.rect(tree, (120, 72, 40), (25, 60, 10, 40))   # draw ON the tree, not on the screen
screen.blit(tree, (200, 350))             # copy it so its TOP-LEFT corner lands at (200, 350)
Shapes drawn on a Surface use that Surface's grid, so (0, 0) is the tree's own top-left corner, wherever the tree ends up on screen. That is the big win: you design a thing once, in its own little coordinate grid, then place copies anywhere.
See-through Surfaces with SRCALPHA
A new Surface starts out solid black, so a round tree would sit inside a black box. For shapes with see-through parts, ask for per-pixel alpha with pygame.SRCALPHA. Such a Surface starts fully transparent, and you draw on it with 4-number colors: (red, green, blue, alpha), where alpha 0 is invisible and 255 is solid.
Two details trip people up:
- The alpha only matters on an
SRCALPHASurface. The screen itself has no alpha channel, sopygame.draw.circle(screen, (255, 0, 0, 50), ...)draws a solid red circle. To get a see-through circle, draw it on anSRCALPHASurface and blit that. - Drawing does not blend. It writes your color, alpha included, straight into the Surface's pixels. Blending happens when you blit the Surface onto another one. So three overlapping puffs drawn with alpha 170 make one evenly see-through cloud, not a cloud with darker overlaps.
import pygame

pygame.init()
screen = pygame.display.set_mode((800, 600))
pygame.display.set_caption("Build Once, Draw Many")
clock = pygame.time.Clock()


def make_tree():
    """Draw one tree on its own see-through Surface and return it."""
    tree = pygame.Surface((80, 120), pygame.SRCALPHA)       # starts fully transparent
    pygame.draw.rect(tree, (120, 72, 40), (34, 70, 12, 50))                # trunk
    pygame.draw.circle(tree, (34, 139, 34), (40, 45), 38)                  # leaves
    pygame.draw.circle(tree, (60, 170, 60), (28, 32), 14)                  # lighter patch
    return tree


def make_fog():
    """A wide, pale, half-transparent band."""
    fog = pygame.Surface((800, 120), pygame.SRCALPHA)
    fog.fill((220, 225, 235, 110))
    return fog


tree = make_tree()          # built ONCE, before the loop
fog = make_fog()
tree_spots = [(60, 380), (180, 360), (330, 390), (470, 350), (620, 375)]

running = True
while running:
    clock.tick(60)
    for event in pygame.event.get():
        if event.type == pygame.QUIT:
            running = False

    screen.fill((135, 206, 235))
    pygame.draw.rect(screen, (76, 175, 80), (0, 470, 800, 130))
    for spot in tree_spots:
        screen.blit(tree, spot)         # the same Surface, stamped five times
    screen.blit(fog, (0, 430))          # the trees show through the fog
    pygame.display.flip()

pygame.quit()
If you want a whole Surface to fade in or out, surface.set_alpha(128) makes every pixel half transparent when it is blitted. Per-pixel alpha (SRCALPHA) is for shapes with see-through parts; set_alpha is for fading the whole thing.
🔤 Text on the Screen
pygame can't draw text directly onto the screen. Instead, a Font renders your text into a brand-new Surface, and you blit that Surface like any other:
font = pygame.font.Font(None, 36)         # None = pygame's built-in font, 36 pixels tall

# ...inside the game loop, in the draw step:
label = font.render(f"Score: {score}", True, (255, 255, 255))
screen.blit(label, (10, 10))
render(text, antialias, color):Truefor antialias smooths the letter edges. Add a fourth argument, a background color, to put the text on a solid box so it stays readable over a busy scene.- Create the font once, before the loop. Loading a font reads a font file from disk; doing that 60 times a second is wasted work. Rendering the text each frame is fine, because the score changes.
pygame.font.SysFont("arial", 24)uses a font installed on the computer, and quietly falls back to the built-in one if it can't find it.- The built-in font has no emoji, so they show up as empty boxes. Stick to plain letters, digits and punctuation, or draw little icons with shapes.
✅ Growth Mindset: Errors Are Directions
ValueError: invalid color or TypeError: argument 1 must be pygame.surface.Surface can look scary, but read them as directions. The first says "a color is outside 0 to 255", so reach for clamp_color(). The second (it ends with not tuple) usually means the arguments are in the wrong order: the Surface always comes first, then the color. When something fails, print the values just before the failing line (print(sky)). Seeing the real numbers turns a mystery into a small fix.
🏋️ Practice Exercise: Sunset Scene
Objective: draw a small scene of a house on a hill under see-through clouds, then make the sun set and the sky darken without any color ever going out of range.
Time: about 30 minutes. Starter file: sunset_scene_starter.py (your instructor has it). It shows a blue sky and a strip of ground; its numbered comments match the steps below.
- Run the starter: you should see a light blue sky over dark green ground. (≈ 2 min)
- Draw the sun, a circle at
(620, sun_y)with radius 60, and then the hill, an ellipse in the rectangle(-200, 380, 1200, 440). Swap the two lines and see what changes. (≈ 5 min) - Fill in
draw_house(): a body rectangle, the same rectangle again as a 4-pixel outline, a triangle roof withpygame.draw.polygon, a door and a window. (≈ 7 min) - Fill in
make_cloud(): a 160 × 70SRCALPHASurface with three overlapping white ellipses in the color(255, 255, 255, 170). The loop already blits it three times. (≈ 5 min) - Make the sun sink (
sun_y = 120 + SUN_SPEED * seconds) and makesky_color()subtractSKY_FADE * secondsfrom each channel ofSKY_DAY. Run it and wait about 11 seconds: it crashes with aValueError. (≈ 4 min) - Write
clamp_color()and run it again. The sky now fades to black and stays there. (≈ 4 min) - Create a font once, before the loop, and draw
Sunset: 3.2 son a dark box in the top-left corner every frame. (≈ 3 min)
You are done when:
- the sun slides down and disappears behind the hill, not in front of it;
- you can see the sky through the clouds;
- the program runs for a full minute without an error while the sky fades to black;
- closing the window prints a line like
Final sky color: (0, 0, 0).
💡 Hint
For the roof, the two bottom corners sit a little wider than the house's top edge ((285, 360) and (515, 360)) and the peak sits above the middle ((400, 270)): smaller y means higher. If your clouds show up as black boxes, the Surface is missing pygame.SRCALPHA. If sky_color() gives you trouble, unpack first: r, g, b = SKY_DAY and fade_r, fade_g, fade_b = SKY_FADE, then build the tuple (r - fade_r * seconds, ...) and pass it to clamp_color().
✅ Example Solution
If your instructor hands you the lab file, you will see a few extra lines marked lab runtime near the top and and frame_budget() in the loop. They let the instructor's checker run the program automatically for a fixed number of frames; when you run it yourself they do nothing. You never need to write them.
"""Sunset Scene: Intro Lesson 2 practice exercise (solution).

A sun sinks behind a green hill while the sky slowly darkens. Every color
the program calculates goes through clamp_color(), so no channel can leave
the 0-255 range. Close the window to quit.
"""
import pygame


WIDTH, HEIGHT = 800, 600
FPS = 60

SKY_DAY = (135, 206, 235)      # light blue at the start
SKY_FADE = (12, 18, 16)        # how much red, green and blue drop per second
SUN_COLOR = (255, 200, 60)
SUN_SPEED = 25                 # pixels per second (downward)
HILL_COLOR = (76, 175, 80)
GROUND_COLOR = (56, 142, 60)
HOUSE_COLOR = (205, 133, 63)
OUTLINE_COLOR = (70, 40, 20)
ROOF_COLOR = (165, 42, 42)
WINDOW_COLOR = (255, 235, 150)
TEXT_COLOR = (240, 240, 240)
LABEL_BG = (30, 30, 40)
CLOUD_SPOTS = [(60, 70), (300, 40), (480, 110)]


def clamp_color(color):
    """Return color with every channel forced to a whole number from 0 to 255."""
    return tuple(max(0, min(255, int(channel))) for channel in color)


def sky_color(seconds):
    """The sky color after the sunset has run for this many seconds."""
    r, g, b = SKY_DAY
    fade_r, fade_g, fade_b = SKY_FADE
    return clamp_color((r - fade_r * seconds, g - fade_g * seconds, b - fade_b * seconds))


def make_cloud():
    """Build a see-through cloud once. The caller blits it as often as it likes."""
    cloud = pygame.Surface((160, 70), pygame.SRCALPHA)     # starts fully transparent
    puff = (255, 255, 255, 170)                            # alpha 170: partly see-through
    pygame.draw.ellipse(cloud, puff, (0, 20, 90, 50))
    pygame.draw.ellipse(cloud, puff, (45, 0, 80, 60))
    pygame.draw.ellipse(cloud, puff, (80, 20, 80, 50))
    return cloud


def draw_house(screen):
    """A house standing on the ground: body, outline, roof, door and window."""
    pygame.draw.rect(screen, HOUSE_COLOR, (300, 360, 200, 150))
    pygame.draw.rect(screen, OUTLINE_COLOR, (300, 360, 200, 150), 4)      # width 4 = outline
    pygame.draw.polygon(screen, ROOF_COLOR, [(285, 360), (515, 360), (400, 270)])
    pygame.draw.rect(screen, OUTLINE_COLOR, (380, 440, 40, 70))            # door
    pygame.draw.rect(screen, WINDOW_COLOR, (320, 390, 45, 40))             # window
    pygame.draw.rect(screen, OUTLINE_COLOR, (320, 390, 45, 40), 3)


def main():
    pygame.init()
    screen = pygame.display.set_mode((WIDTH, HEIGHT))
    pygame.display.set_caption("Sunset Scene")
    clock = pygame.time.Clock()
    font = pygame.font.Font(None, 30)       # fonts are created once, before the loop
    cloud = make_cloud()                    # so is the cloud Surface

    seconds = 0.0
    running = True
    while running:
        dt = clock.tick(FPS) / 1000

        for event in pygame.event.get():
            if event.type == pygame.QUIT:
                running = False

        seconds += dt
        sun_y = 120 + SUN_SPEED * seconds

        # Draw back to front: whatever is drawn later covers what is already there.
        screen.fill(sky_color(seconds))
        pygame.draw.circle(screen, SUN_COLOR, (620, sun_y), 60)
        pygame.draw.ellipse(screen, HILL_COLOR, (-200, 380, 1200, 440))    # hides the setting sun
        pygame.draw.rect(screen, GROUND_COLOR, (0, 500, WIDTH, 100))
        draw_house(screen)
        for spot in CLOUD_SPOTS:
            screen.blit(cloud, spot)

        label = font.render(f"Sunset: {seconds:.1f} s", True, TEXT_COLOR, LABEL_BG)
        screen.blit(label, (10, 10))
        pygame.display.flip()

    pygame.quit()
    print(f"Final sky color: {sky_color(seconds)}")


if __name__ == "__main__":
    main()
📓 Learning Journal
Take five minutes to write in your learning journal (a notebook or a plain text file works). Jot down:
- Key concepts you learned today
- Techniques that clicked (and the ones that haven't, yet)
- Questions or confusion to bring to the next session
- Ideas to try in your own game
- Progress and feelings: how did this lesson go for you?
✍️ This lesson's prompts:
- Explain "y grows downward" to a friend using something they see every day (a page of a book, a spreadsheet, a building's floors). Which comparison works best for you?
- Pick a scene from a game you like. List its layers from back to front, the order you would draw them in.
- What happened when your sky went out of range? Write down, in your own words, what
clamp_color()protects you from.
📝 Summary
You learned to see the window as a grid of pixels with (0, 0) at the top-left and y growing downward, and you filled it with rectangles, circles, ellipses, lines, polygons and text. Colors are RGB tuples, and any color you calculate goes through clamp_color() so it never leaves the 0 to 255 range. You also built your own Surfaces, including see-through SRCALPHA ones, drew on them once, and blitted them as many times as you liked. That build-once, blit-many idea is exactly how images and sprites work later in the course.
🎓 Key Takeaways
- (0, 0) is the top-left corner; x grows right and y grows down.
- Every
pygame.drawfunction takes the Surface, the color, the shape's numbers and an optional width: 0 fills, a positive number draws an outline. - Draw back to front: whatever is drawn later covers what is already there.
- Pass every calculated color through
clamp_color(); pygame raisesValueErrorfor channels outside 0 to 255. - Build Surfaces (and fonts) once, before the loop, then blit them every frame. Use
pygame.SRCALPHAand RGBA colors for see-through parts.
🔭 Looking Ahead
Your scene looks good, but you can't touch it yet. In the next lesson, Keyboard, Mouse & Gamepad, you read the player's keys, clicks, mouse wheel and controllers, and make a square run and jump.
❓ Common Questions
Why does y grow downward? That seems backwards.
Old TV-style screens drew the picture one line at a time from the top, the same way you read a page, and computer graphics kept that habit, so the top-left pixel is the natural starting point. The HTML canvas and most image editors count the same way, so the habit you build now carries over to other tools.
I used a color with four numbers but my shape is not see-through. Why?
The alpha (fourth) number only matters on a Surface created with pygame.SRCALPHA. The screen has no alpha channel, so the shape is drawn solid. Draw the shape on an SRCALPHA Surface and blit that Surface onto the screen instead.
Do I have to redraw everything every frame?
Yes: screen.fill() wipes the frame, so anything you don't draw again disappears. That is what makes movement possible. The cost of redrawing is exactly why Surfaces help: build a complicated picture once, then a single blit redraws it each frame.
Can I use color names instead of tuples?
Yes. pygame.Color("tomato") or even just the string "tomato" works wherever pygame expects a color. Tuples are still handy when you calculate colors, because you can do math on each channel and pass the result through clamp_color().
My outline looks a little thinner or thicker than I expected.
For rectangles, circles and ellipses the outline grows inward from the shape's edge, so a 4-pixel outline on a 200-pixel-wide rectangle still fits in 200 pixels. Polygons and lines are a little different: very thick polygon outlines can spread outside the points you gave. Stick to small widths (1 to 6) and you will rarely notice.
My text shows little boxes instead of emoji.
pygame's built-in font has no emoji, so it draws an empty box for each one. Use plain text ("Lives: 3"), or draw a small heart or star with the shape functions.
🎯 Quick Quiz
Question 1: In an 800 × 600 window, which point is closest to the bottom-left corner?
Question 2: What does the last argument do in pygame.draw.rect(screen, RED, (50, 60, 120, 80), 4)?
Question 3: Your sky color is (135 - 12 * t, 206 - 18 * t, 235 - 16 * t) with no clamping. What happens once t reaches 15 seconds?
Question 4: You want a cloud whose edges let the sky show through. How should you create its Surface?
Question 5: Where should font = pygame.font.Font(None, 30) go in a game?
🌟 Going Further
- Gradient sky: instead of one
fill(), draw 60 horizontal lines, each 10 pixels thick, whose color gets a little darker toward the top. Useclamp_color()for every one. - Stars at night: once the sky is dark, draw a few small white circles. Make them fade in by drawing them on an
SRCALPHASurface and raising itsset_alpha()value over time. - Rounded corners:
pygame.draw.recttakes aborder_radius=keyword. Give your house's windows rounded corners. - Drifting clouds: give each cloud its own x position and add
20 * dtto it every frame, wrapping back to the left when it leaves the screen, as the square did in The Game Loop. - Read the docs: skim the pygame-ce pages for pygame.draw, pygame.Surface and pygame.font. Find one drawing function or argument you haven't used yet.