Lesson 14: Post-processing
You will build the chain of full-screen passes that gives a game its final look: glowing lights, darkened corners and highlights that roll off instead of clipping to flat white. Post-processing works on the finished image, so one small pipeline restyles every scene you will ever draw.
🎯 Learning Objectives
By the end of this lesson, you will be able to:
- Render into an offscreen framebuffer and use the result as a texture in the next pass.
- Explain why a chain of passes ping-pongs between two textures instead of reading and writing one.
- Build a correct bloom: a luminance bright pass, then a separable Gaussian blur, then an additive composite.
- Add a vignette and a tone map, and predict how changing the order of passes changes the picture.
- Measure a post-processing chain on the CPU with numpy and on the GPU, instead of guessing.
Project: a Bloom Pipeline that makes the bright orbs of a pygame scene glow, with switchable vignette, tone mapping and pass order.
In This Lesson
📸 Filters for the Whole Frame
A photo app's filters don't care what is in the picture. They take the finished photo and change it: warmer colors, a soft glow, darker corners. Post-processing does the same for a game. You draw the scene as usual, but into an offscreen image instead of the screen, then run a chain of full-screen passes over it. Each pass is the full-screen quad from moderngl Foundations with a fragment shader that reads the previous image as a texture and writes a new one.
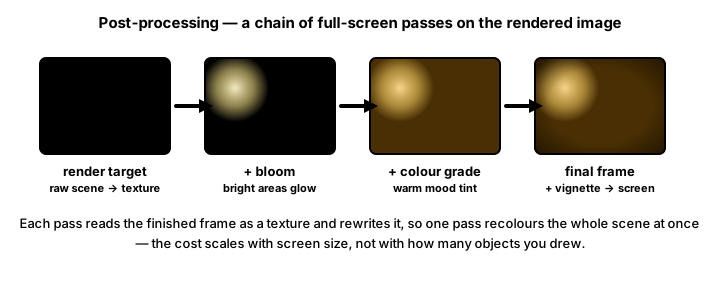
That is the whole plan for this lesson. Try it first: the demo below runs exactly this chain in your browser. Use the View buttons to look at each stage.
Look at the bright pass: the two dull orbs vanish completely. Only the parts of the scene above a brightness threshold are allowed to glow.
🗂️ Framebuffers: Drawing Into a Texture
So far everything you drew went to the screen. A framebuffer is a drawing target you create yourself. Attach a texture to it, draw, and the pixels land in that texture, ready for the next pass to sample:
half = (SIZE[0] // 2, SIZE[1] // 2)
glow_tex = ctx.texture(half, 4)                             # an empty RGBA texture
glow_tex.repeat_x = glow_tex.repeat_y = False               # clamp at the edges
glow_fbo = ctx.framebuffer(color_attachments=[glow_tex])    # draw INTO glow_tex

glow_fbo.use()          # from now on, draws land in glow_tex (viewport = its size)
bright_vao.render(moderngl.TRIANGLE_STRIP)

target.use()            # back to the screen for the final pass
glow_tex.use(1) # ...where glow_tex is read as an ordinary texturefbo.use()makes the framebuffer the current target and sets the viewport to its size, so a half-size framebuffer gets a half-size viewport automatically.- The screen is a framebuffer too:
ctx.screen. The scaffold's headless branch hands you an offscreenfboinstead, so the pipeline takes the target as a parameter:target = fbo if fbo is not None else ctx.screen. The same code then runs in a window and under the lab checker. - A normal texture stores 8 bits per channel, so any value above 1.0 written into it is clamped to 1.0. Keeping values above 1 between passes (true HDR) needs a float texture, such as
ctx.texture(size, 4, dtype="f2"). This lesson's chain only goes above 1 inside the final composite shader, so 8-bit textures are enough.
🏓 Ping-Pong: Two Textures for Any Chain
Can a blur pass read a texture and write its result back into the same texture? No. Every pixel of the blur reads its neighbors, and those neighbors are being overwritten at the same moment, in no guaranteed order. OpenGL calls this a feedback loop, and the result is undefined: it may look right on one GPU and be garbage on another.
The fix is two textures that take turns, like a table-tennis rally: pass 1 reads ping and writes pong, pass 2 reads pong and writes ping, and so on. Each pass needs exactly one input and one output, so two textures are enough for a chain of any length. The scene texture stays separate, because the final composite needs the original scene as well as the glow.
for _ in range(rounds):
    pong_fbo.use()                 # ping -> pong: horizontal blur
    ping_tex.use(0)
    set_uniform(blur, "u_direction", (1.0, 0.0))
    blur_vao.render(moderngl.TRIANGLE_STRIP)

    ping_fbo.use()                 # pong -> ping: vertical blur
    pong_tex.use(0)
    set_uniform(blur, "u_direction", (0.0, 1.0))
    blur_vao.render(moderngl.TRIANGLE_STRIP)
# after the loop, ping_tex holds the finished glow
One shader does both directions. The uniform u_direction is (1, 0) for a horizontal pass and (0, 1) for a vertical one, and the shader multiplies it by the size of one texel.
✨ Bloom Done Right
In a real camera, very bright lights bleed into the pixels around them. Bloom fakes that bleed in three passes. Keep the order straight, because a very common bug is to blur the whole image and add it back, which makes everything brighter and hazier instead of making the lights glow.
1. The bright pass: choose what glows
vec3 c = texture(u_scene, v_uv).rgb;
float luma = dot(c, vec3(0.2126, 0.7152, 0.0722));        // Rec. 709 brightness
float keep = smoothstep(u_threshold, u_threshold + 0.1, luma);
f_color = vec4(c * keep, 1.0);                             // dim pixels become black
The weights are the Rec. 709 luminance coefficients from HDTV. They count green far more than blue because our eyes see green as much brighter: pure green (0, 1, 0) scores 0.72 while pure blue (0, 0, 1) scores only 0.07. Averaging red, green and blue equally would call both "equally bright", and your blue lights would glow as much as your green ones. smoothstep fades pixels in over a small range instead of switching them on at one exact value, which stops edges from flickering as objects move.
2. The separable blur: spread the light
// A 9-tap Gaussian: the center weight plus 4 weights used on both sides (sum = 1).
const float WEIGHTS[5] = float[](0.227027, 0.1945946, 0.1216216, 0.054054, 0.016216);

void main() {
    vec2 texel_step = u_direction / vec2(textureSize(u_image, 0));
    vec3 sum = texture(u_image, v_uv).rgb * WEIGHTS[0];
    for (int i = 1; i < 5; i++) {
        sum += texture(u_image, v_uv + texel_step * float(i)).rgb * WEIGHTS[i];
        sum += texture(u_image, v_uv - texel_step * float(i)).rgb * WEIGHTS[i];
    }
    f_color = vec4(sum, 1.0);
}- Separable. A Gaussian blur in 2D gives exactly the same result as a 1D Gaussian blur across, followed by a 1D Gaussian blur down. With 9 taps that is 9 + 9 = 18 texture reads per pixel instead of 9 × 9 = 81, and the gap grows with the blur size.
- Weights that sum to 1. The center weight plus twice the other four adds up to 1.0 (to within a millionth). A flat area stays exactly as bright after blurring, so the blur spreads light without adding any.
- Half resolution. The pipeline blurs at half width and half height: a quarter of the pixels, and each tap reaches twice as far in screen pixels. The result is scaled back up with linear filtering, which a soft glow hides well. Repeating the horizontal-plus-vertical round widens the glow further.
3. The composite: add the glow
vec3 scene = texture(u_scene, v_uv).rgb;
vec3 glow = texture(u_bloom, v_uv).rgb * u_intensity;
vec3 c = scene + glow;                                      // light adds up
Light is additive: two lights on the same wall make it brighter, never darker, so the glow is added to the original scene. Adding can push values past 1.0, which is where tone mapping comes in.
✅ Growth Mindset: Look at One Pass at a Time
When a multi-pass effect looks wrong, the temptation is to change five numbers at once. Resist it. Graphics programmers debug a pipeline the way you just used the demo's View buttons: show the output of one pass on screen, confirm it, then move to the next. In your own code, temporarily draw ping_tex to the screen with the plain shader from moderngl Foundations. Every stage you confirm is a stage you never have to doubt again, and the bug has nowhere left to hide.
🎞️ Vignette, Tone Mapping and Pass Order
A vignette darkens the corners to pull the eye toward the center, as old camera lenses did by accident. It is one small function of the distance from the middle of the screen:
float vignette(vec2 uv) {
    float d = distance(uv, vec2(0.5)) / 0.7071;      // 0 at the center, 1 in a corner
    return 1.0 - smoothstep(0.45, 1.0, d);
}
Tone mapping squeezes brightness that may exceed 1.0 back into the 0 to 1 range a screen can show. Without it, every glowing pixel above 1.0 is clipped to the same flat white and the glow loses its shape. A simple curve with an exposure control:
c = vec3(1.0) - exp(-c * u_exposure); // 0 stays 0, large values approach 1 but never reach itDark values are simply scaled by the exposure (for small values, 1 − e−c·k is close to c·k, where k is the exposure), while bright values are compressed smoothly, so two overlapping glows still look different from one. Tone mapping belongs at the very end, after everything that adds light.
Order matters
Most passes don't commute: swapping two of them changes the picture. Take the vignette and the bloom:
- Bloom, then vignette: the glow is calculated from the full scene, then everything, glow included, is darkened toward the corners.
- Vignette, then bloom: the corners are darkened before the bright pass looks at them, so a light near a corner may drop below the threshold and not glow at all.
Neither is wrong; they are different looks. In the practice exercise, the O key swaps them so you can see the difference on a moving scene. The rule to remember: decide the order deliberately, and keep tone mapping last.
🧮 The Same Chain in NumPy
You can run the same chain on the CPU with numpy, which is a good way to check your understanding. The lab file numpy_bloom_solution.py does exactly that. Its blur shows one detail that matters on the CPU as much as on the GPU: what happens at the edges of the image.
WEIGHTS = np.array([0.227027, 0.1945946, 0.1216216, 0.054054, 0.016216], dtype=np.float32)


def blur_axis(img, axis):
    """9-tap Gaussian along one axis. Edge pixels are repeated (clamped), not wrapped."""
    pad = [(0, 0)] * img.ndim
    pad[axis] = (4, 4)
    padded = np.pad(img, pad, mode="edge")
    n = img.shape[axis]
    out = WEIGHTS[0] * np.take(padded, range(4, 4 + n), axis=axis)
    for i in range(1, 5):
        out += WEIGHTS[i] * (np.take(padded, range(4 + i, 4 + i + n), axis=axis) +
                             np.take(padded, range(4 - i, 4 - i + n), axis=axis))
    return out
Shifting with np.roll looks shorter, but it wraps: a bright lamp at the left edge would leak light onto the right edge of the screen. Padding with mode="edge" repeats the border pixels instead, which is exactly what the GPU texture does with repeat_x = repeat_y = False.
📏 Measured, not guessed
On the machine used to write this lesson (an Intel Core i7-12700K under WSL2, with Intel UHD 770 graphics through Mesa), the numpy chain took about 47 ms per 960 × 540 frame, far over the 16.7 ms a 60 FPS frame allows. The GPU pipeline with the same settings (bright pass, four blur rounds at half size, composite) took about 1.5 ms. Both lab programs show their own timings in the window title, so measure on your machine before you decide.
🏋️ Practice Exercise: Bloom Pipeline
Objective: make the bright orbs of a moving pygame scene glow on the GPU with a bright pass, a ping-pong blur and a composite that adds vignette and tone mapping.
Time: about 45 minutes. Starter file: bloom_pipeline_starter.py (your instructor has it). The scaffold, the textures and framebuffers, the scene and the keys are done. Its numbered to-do comments match the steps below.
- Run the starter. The whole scene "glows" into a haze, because every pixel passes the bright pass and nothing is blurred. (≈ 3 min)
- In
BRIGHT_FRAG, compute the Rec. 709 luminance and keep only pixels aboveu_threshold. The haze disappears; only the lights are left to glow. (≈ 10 min) - In
BLUR_FRAG, write the 9-tap loop that samples alongu_direction. (≈ 10 min) - In
BloomPipeline.render(), write the ping-pong loop:blur_roundstimes, horizontal from ping into pong, then vertical from pong into ping. Count each pass. (≈ 12 min) - In
COMPOSITE_FRAG, add the tone map. Then try the keys: B, V, T, O, and[]for the threshold. (≈ 10 min)
You are done when:
- only the three bright orbs and the white strip glow; the two dull orbs never do;
- the window title shows 10 passes with bloom on (1 bright + 8 blur + 1 composite) and 1 with bloom off;
- pressing O visibly changes the corners, and T changes how hard the glow's center clips;
- closing the window prints
Passes in the last frame:andFrames drawn:.
💡 Hint
If the glow looks blocky, you are probably stepping by whole screen pixels instead of texels of the half-size texture: divide u_direction by textureSize(u_image, 0), not by the window size. If everything goes black after your loop, check that the last blur writes into ping, because the composite reads ping_tex. Use the demo's View buttons as a picture of what each stage should look like.
✅ Example Solution
The lab file your instructor runs also contains a short block marked lab runtime and and frame_budget() in the loop, so the checker can run it for a fixed number of frames. They are left out here and do nothing when you run it yourself.
"""Bloom Pipeline: Advanced Lesson 14 practice exercise (solution).

pygame-ce draws a night scene with bright and dim orbs onto a Surface. The
GPU then runs a post-processing chain on it every frame:
    bright pass -> blur (horizontal, vertical, ping-pong) -> composite
The composite adds the glow to the scene, darkens the corners (vignette)
and tone-maps the result.
    B bloom on/off   V vignette on/off   T tone map on/off
    O vignette before/after bloom   [ ] threshold   Esc quit
"""
import os
import sys
from dataclasses import dataclass

import moderngl
import numpy as np
import pygame


SIZE = (960, 540)


def make_context():
    """Return (ctx, fbo). Window + GL 3.3 core normally; headless EGL under the lab checker."""
    if os.environ.get("LAB_GL") == "egl":
        try:
            ctx = moderngl.create_standalone_context(backend="egl")
        except Exception as exc:
            print("SKIP: no headless OpenGL:", exc)
            sys.exit(77)                      # 77 = SKIP, not FAIL
        fbo = ctx.simple_framebuffer(SIZE)
        fbo.use()
        return ctx, fbo
    pygame.display.gl_set_attribute(pygame.GL_CONTEXT_MAJOR_VERSION, 3)
    pygame.display.gl_set_attribute(pygame.GL_CONTEXT_MINOR_VERSION, 3)
    pygame.display.gl_set_attribute(pygame.GL_CONTEXT_PROFILE_MASK, pygame.GL_CONTEXT_PROFILE_CORE)
    pygame.display.gl_set_attribute(pygame.GL_CONTEXT_FORWARD_COMPATIBLE_FLAG, True)  # macOS
    pygame.display.set_mode(SIZE, pygame.OPENGL | pygame.DOUBLEBUF)
    return moderngl.create_context(), None


VERTEX_SHADER = """#version 330 core
in vec2 in_pos;
in vec2 in_uv;
out vec2 v_uv;

void main() {
    v_uv = in_uv;
    gl_Position = vec4(in_pos, 0.0, 1.0);
}
"""

VIGNETTE_GLSL = """
float vignette(vec2 uv) {
    float d = distance(uv, vec2(0.5)) / 0.7071;      // 0 at the center, 1 in a corner
    return 1.0 - smoothstep(0.45, 1.0, d);
}
"""

BRIGHT_FRAG = """#version 330 core
uniform sampler2D u_scene;
uniform float u_threshold;       // luminance where the glow starts (0..1)
uniform bool u_vignette_first;   // darken the corners BEFORE choosing what glows?
in vec2 v_uv;
out vec4 f_color;
""" + VIGNETTE_GLSL + """
void main() {
    vec3 c = texture(u_scene, v_uv).rgb;
    if (u_vignette_first) {
        c *= vignette(v_uv);
    }
    float luma = dot(c, vec3(0.2126, 0.7152, 0.0722));   // Rec. 709 weights
    float keep = smoothstep(u_threshold, u_threshold + 0.1, luma);
    f_color = vec4(c * keep, 1.0);                        // dim pixels become black
}
"""

BLUR_FRAG = """#version 330 core
uniform sampler2D u_image;
uniform vec2 u_direction;        // (1, 0) = horizontal pass, (0, 1) = vertical pass
in vec2 v_uv;
out vec4 f_color;

// A 9-tap Gaussian: the center weight plus 4 weights used on both sides (sum = 1).
const float WEIGHTS[5] = float[](0.227027, 0.1945946, 0.1216216, 0.054054, 0.016216);

void main() {
    vec2 texel_step = u_direction / vec2(textureSize(u_image, 0));
    vec3 sum = texture(u_image, v_uv).rgb * WEIGHTS[0];
    for (int i = 1; i < 5; i++) {
        sum += texture(u_image, v_uv + texel_step * float(i)).rgb * WEIGHTS[i];
        sum += texture(u_image, v_uv - texel_step * float(i)).rgb * WEIGHTS[i];
    }
    f_color = vec4(sum, 1.0);
}
"""

COMPOSITE_FRAG = """#version 330 core
uniform sampler2D u_scene;
uniform sampler2D u_bloom;
uniform float u_intensity;       // how strong the glow is (0 = no bloom)
uniform bool u_vignette;
uniform bool u_vignette_first;
uniform bool u_tonemap;
uniform float u_exposure;
in vec2 v_uv;
out vec4 f_color;
""" + VIGNETTE_GLSL + """
void main() {
    vec3 scene = texture(u_scene, v_uv).rgb;
    vec3 glow = texture(u_bloom, v_uv).rgb * u_intensity;
    float v = u_vignette ? vignette(v_uv) : 1.0;
    vec3 c = u_vignette_first ? scene * v + glow : (scene + glow) * v;
    if (u_tonemap) {
        c = vec3(1.0) - exp(-c * u_exposure);   // squeeze 0..infinity into 0..1
    }
    f_color = vec4(clamp(c, 0.0, 1.0), 1.0);
}
"""

QUAD = np.array([
    # x,    y,    u,   v
    -1.0, -1.0,  0.0, 0.0,
     1.0, -1.0,  1.0, 0.0,
    -1.0,  1.0,  0.0, 1.0,
     1.0,  1.0,  1.0, 1.0,
], dtype="f4")


@dataclass
class BloomSettings:
    bloom: bool = True
    threshold: float = 0.5
    intensity: float = 1.8
    blur_rounds: int = 4          # each round = one horizontal + one vertical pass
    vignette: bool = True
    vignette_first: bool = False
    tonemap: bool = True
    exposure: float = 2.0


def set_uniform(prog, name, value):
    """Set a uniform if the shader still has it (GLSL drops uniforms it never uses)."""
    if name in prog:
        prog[name].value = value


class BloomPipeline:
    """Owns the shaders and the two half-size ping-pong textures."""

    def __init__(self, ctx, size):
        self.ctx = ctx
        vbo = ctx.buffer(QUAD.tobytes())
        self.bright = ctx.program(vertex_shader=VERTEX_SHADER, fragment_shader=BRIGHT_FRAG)
        self.blur = ctx.program(vertex_shader=VERTEX_SHADER, fragment_shader=BLUR_FRAG)
        self.composite = ctx.program(vertex_shader=VERTEX_SHADER, fragment_shader=COMPOSITE_FRAG)
        self.vaos = {prog: ctx.vertex_array(prog, [(vbo, "2f 2f", "in_pos", "in_uv")])
                     for prog in (self.bright, self.blur, self.composite)}
        half = (max(1, size[0] // 2), max(1, size[1] // 2))      # blur at half size: 1/4 the pixels
        self.ping_tex, self.pong_tex = ctx.texture(half, 4), ctx.texture(half, 4)
        for tex in (self.ping_tex, self.pong_tex):
            tex.repeat_x = tex.repeat_y = False                  # clamp: no glow wrapping
        self.ping = ctx.framebuffer(color_attachments=[self.ping_tex])
        self.pong = ctx.framebuffer(color_attachments=[self.pong_tex])

    def _draw(self, prog):
        self.vaos[prog].render(moderngl.TRIANGLE_STRIP)

    def render(self, scene_tex, target, s):
        """Run the chain from scene_tex into target. Returns how many passes ran."""
        passes = 0
        if s.bloom:
            # 1. Bright pass: scene -> ping (only pixels above the threshold survive).
            self.ping.use()
            scene_tex.use(0)
            set_uniform(self.bright, "u_scene", 0)
            set_uniform(self.bright, "u_threshold", s.threshold)
            set_uniform(self.bright, "u_vignette_first", s.vignette and s.vignette_first)
            self._draw(self.bright)
            passes += 1
            # 2. Separable blur, ping-ponging: ping -> pong (horizontal), pong -> ping (vertical).
            for _ in range(s.blur_rounds):
                for src_tex, dst, direction in ((self.ping_tex, self.pong, (1.0, 0.0)),
                                                (self.pong_tex, self.ping, (0.0, 1.0))):
                    dst.use()
                    src_tex.use(0)
                    set_uniform(self.blur, "u_image", 0)
                    set_uniform(self.blur, "u_direction", direction)
                    self._draw(self.blur)
                    passes += 1
        # 3. Composite: scene + glow, vignette, tone map -> the screen (or the lab's fbo).
        target.use()
        scene_tex.use(0)
        self.ping_tex.use(1)
        set_uniform(self.composite, "u_scene", 0)
        set_uniform(self.composite, "u_bloom", 1)
        set_uniform(self.composite, "u_intensity", s.intensity if s.bloom else 0.0)
        set_uniform(self.composite, "u_vignette", s.vignette)
        set_uniform(self.composite, "u_vignette_first", s.vignette_first)
        set_uniform(self.composite, "u_tonemap", s.tonemap)
        set_uniform(self.composite, "u_exposure", s.exposure)
        self._draw(self.composite)
        return passes + 1


ORBS = [  # x, y, vx, vy (px, px/s), radius, color: three bright orbs and two dim ones
    [180.0, 200.0, 90.0, 60.0, 34, (255, 130, 80)],
    [480.0, 300.0, -70.0, 95.0, 30, (80, 210, 255)],
    [700.0, 160.0, 80.0, -55.0, 26, (255, 240, 120)],
    [320.0, 420.0, -95.0, -70.0, 38, (60, 60, 90)],
    [820.0, 400.0, 55.0, -85.0, 24, (90, 80, 60)],
]


def update_orbs(dt):
    for orb in ORBS:
        orb[0] += orb[2] * dt
        orb[1] += orb[3] * dt
        r = orb[4]
        if not r <= orb[0] <= SIZE[0] - r:
            orb[2] = -orb[2]
            orb[0] = max(r, min(SIZE[0] - r, orb[0]))
        if not r <= orb[1] <= SIZE[1] - r:
            orb[3] = -orb[3]
            orb[1] = max(r, min(SIZE[1] - r, orb[1]))


def draw_scene(surf):
    surf.fill((14, 16, 26))
    for i in range(0, SIZE[0], 48):                          # a dim floor grid
        pygame.draw.line(surf, (30, 34, 50), (i, 0), (i, SIZE[1]))
    for x, y, _, _, r, color in ORBS:
        pygame.draw.circle(surf, color, (x, y), r)
    pygame.draw.rect(surf, (250, 250, 250), (60, 470, 300, 12))   # a thin neon strip


def main():
    pygame.init()
    pygame.display.set_caption("Bloom Pipeline")
    ctx, fbo = make_context()
    target = fbo if fbo is not None else ctx.screen

    try:
        pipeline = BloomPipeline(ctx, SIZE)
    except moderngl.Error as err:
        print("Shader error:\n", err)
        pygame.quit()
        return

    scene = pygame.Surface(SIZE)
    scene_tex = ctx.texture(SIZE, 4)
    settings = BloomSettings()
    clock = pygame.time.Clock()
    frames = 0
    passes = 0
    running = True
    while running:
        dt = clock.tick(60) / 1000
        for event in pygame.event.get():
            if event.type == pygame.QUIT:
                running = False
            elif event.type == pygame.KEYDOWN:
                if event.key == pygame.K_ESCAPE:
                    running = False
                elif event.key == pygame.K_b:
                    settings.bloom = not settings.bloom
                elif event.key == pygame.K_v:
                    settings.vignette = not settings.vignette
                elif event.key == pygame.K_t:
                    settings.tonemap = not settings.tonemap
                elif event.key == pygame.K_o:
                    settings.vignette_first = not settings.vignette_first
                elif event.key == pygame.K_RIGHTBRACKET:
                    settings.threshold = min(0.95, settings.threshold + 0.05)
                elif event.key == pygame.K_LEFTBRACKET:
                    settings.threshold = max(0.05, settings.threshold - 0.05)

        update_orbs(dt)
        draw_scene(scene)
        scene_tex.write(pygame.image.tobytes(scene, "RGBA", True))
        passes = pipeline.render(scene_tex, target, settings)
        if fbo is None:
            pygame.display.flip()
        frames += 1

        order = "vignette -> bloom" if settings.vignette_first else "bloom -> vignette"
        pygame.display.set_caption(
            f"Bloom Pipeline | {passes} passes | threshold {settings.threshold:.2f} | {order}")

    print(f"Passes in the last frame: {passes}")
    print(f"Frames drawn: {frames}")
    pygame.quit()


if __name__ == "__main__":
    main()
📓 Learning Journal
Take five minutes to write in your learning journal (a notebook or a plain text file works). Jot down:
- Key concepts you learned today
- Techniques that clicked (and the ones that haven't, yet)
- Questions or confusion to bring to the next session
- Ideas to try in your own game
- Progress and feelings: how did this lesson go for you?
✍️ This lesson's prompts:
- Describe the bloom chain from memory as a recipe with three steps. Why does the bright pass have to come before the blur?
- Pick a game with a strong visual mood. Which post-processing passes do you think it uses, and in what order?
- Which stage of your pipeline took longest to get right, and how did you finally see what it was doing?
📝 Summary
You learned to draw into textures with framebuffers and to chain full-screen passes that each read one texture and write another. Because a pass can't read the texture it is writing, the blur ping-pongs between two half-size textures while the scene waits in a third. You built bloom the right way round: a Rec. 709 bright pass decides what glows, a separable Gaussian spreads it with 18 reads per pixel instead of 81, and the composite adds it back before a vignette and a tone map finish the frame. You also saw that order changes the result, and you measured the same chain on the CPU and the GPU.
🎓 Key Takeaways
- A framebuffer with a texture attached is a drawing target;
fbo.use()also sets the viewport. - Never sample the texture you are rendering into; alternate two textures (ping-pong).
- Bloom = bright pass, then blur, then add. Blurring everything first just brightens the whole image.
- A 2D Gaussian splits into a horizontal and a vertical pass; weights that sum to 1 never add light.
- Tone map last, so values above 1 roll off smoothly instead of clipping to white.
- Clamp at image edges (texture clamp or
np.pad(mode="edge")) so light doesn't wrap around.
🔭 Looking Ahead
In 2D Lighting, you will use the same full-screen tools to light a scene: first with a classic additive lightmap in plain pygame, then on the GPU with normal-mapped walls that catch the light.
❓ Common Questions
Why is my glow square or blocky?
The blur is too small for the resolution, or the steps are wrong. Check that the step is one texel of the texture being read (u_direction / textureSize(u_image, 0)), blur at half size, and run more rounds. Linear filtering on the half-size texture smooths the upscale.
Why does the whole screen get brighter instead of just the lights?
Something other than bright pixels is reaching the blur. Either the bright pass is missing or its threshold is too low. Lower thresholds make more of the scene glow; look at the bright pass on its own (the demo's Bright pass view) to check.
Do I need a float texture for bloom?
Not for this pipeline. The scene comes from a pygame Surface, which is 8-bit, and values only go above 1.0 inside the composite shader. You need float textures (dtype="f2" or "f4") when a pass must store values above 1 for a later pass, for example a scene rendered with very bright lights on the GPU.
What about motion blur, depth of field or ambient occlusion?
They are post-processing effects too, but they need extra information about each pixel: how fast it moves (a velocity buffer) or how far away it is (a depth buffer). A 3D renderer produces those; a 2D pygame scene usually doesn't. Going Further points to readings.
Can I use the numpy version in a real game?
Measure first. At 960 × 540 it was far too slow to run every frame on the machine used for this lesson, but a much smaller image, a lower update rate or a one-off effect (a screenshot filter, a pause-menu background) can work fine.
🎯 Quick Quiz
Question 1: Why does the blur ping-pong between two textures instead of blurring one texture in place?
Question 2: What does the bright pass do?
Question 3: How many texture reads per pixel does a separable 9-tap blur need, compared with a full 9 × 9 blur?
Question 4: Why does the composite tone-map the color after adding the glow?
Question 5: You switch to "vignette, then bloom". What happens to a lamp near a corner of the screen?
🌟 Going Further
- A better bloom: instead of blurring one half-size texture several times, downsample into a chain of smaller textures (1/2, 1/4, 1/8) and add them back together. Large glows then cost very little.
- Color grading: add a pass that tints shadows and highlights differently, or multiplies by a warm or cold color, and bind it to a key.
- Chromatic aberration as a pass: move the effect from the Shader Sandbox into this chain, before the vignette, and only near the edges of the screen.
- Further reading: motion blur, depth of field and screen-space ambient occlusion need velocity or depth buffers; the LearnOpenGL bloom chapter and its HDR chapter cover the 3D side. The moderngl documentation covers
FramebufferandTexture.