Post-processing Effects
The Final Polish
Transform your game's visuals with stunning post-processing effects! Master bloom, motion blur, depth of field, color grading, and screen-space techniques that make games look professional and cinematic! 🎨📸✨
Understanding Post-processing
📸 The Camera Filter Analogy
Think of post-processing like applying filters to a photo:
- Bloom: Glowing bright areas (overexposure)
- Motion Blur: Directional smearing along movement
- Depth of Field: Focus blur (bokeh effect)
- Color Grading: Mood through color adjustment
- Vignette: Darkened edges for focus
- Screen-Space Effects: SSAO, SSR, lens flares
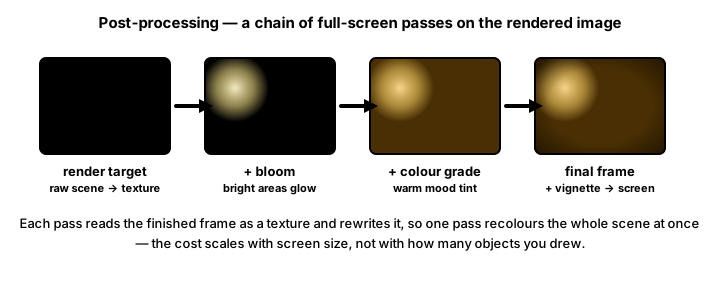
Interactive Post-processing Demo
See post-processing effects in real-time! Toggle effects and adjust parameters to see their impact!
Toggle Effects:
Bloom Settings:
Color Grading:
FPS: 60 | Frame Time: 16.7ms | Active Effects: 3 | Draw Calls: 1
Post-processing Implementation in Python
import moderngl
import numpy as np
import pygame
from pygame.locals import *
from typing import Optional

class PostProcessingPipeline:
    """Post-processing effects pipeline"""
    def __init__(self, ctx: moderngl.Context, width: int, height: int) -> None:
        self.ctx: moderngl.Context = ctx
        self.width: int = width
        self.height: int = height

        self.effects: dict[str, "PostProcessEffect"] = {}
        self.framebuffers: dict[str, moderngl.Framebuffer] = {}
        self.textures: dict[str, moderngl.Texture] = {}

        self.init_pipeline()

    def init_pipeline(self) -> None:
        """Initialize framebuffers and shaders"""
        # Create HDR framebuffer for scene rendering
        self.create_framebuffer('scene', hdr=True)

        # Create ping-pong framebuffers for multi-pass effects
        self.create_framebuffer('ping')
        self.create_framebuffer('pong')

        # Initialize effects
        self.effects['bloom'] = BloomEffect(self)
        self.effects['motion_blur'] = MotionBlurEffect(self)
        self.effects['dof'] = DepthOfFieldEffect(self)
        self.effects['ssao'] = SSAOEffect(self)
        self.effects['color_grading'] = ColorGradingEffect(self)

    def create_framebuffer(self, name: str, hdr: bool = False) -> None:
        """Create a framebuffer for rendering"""
        # Create color texture
        if hdr:
            # Use floating point texture for HDR
            texture = self.ctx.texture(
                (self.width, self.height), 4,
                dtype='f4'
            )
        else:
            texture = self.ctx.texture(
                (self.width, self.height), 4
            )

        texture.filter = (moderngl.LINEAR, moderngl.LINEAR)
        self.textures[name] = texture

        # Create depth buffer
        depth = self.ctx.depth_renderbuffer((self.width, self.height))

        # Create framebuffer
        self.framebuffers[name] = self.ctx.framebuffer(
            color_attachments=[texture],
            depth_attachment=depth
        )

    def process(self, scene_texture: moderngl.Texture) -> moderngl.Texture:
        """Process the scene through effect pipeline"""
        current_texture = scene_texture

        # Apply each enabled effect in sequence
        for effect_name, effect in self.effects.items():
            if effect.enabled:
                current_texture = effect.apply(current_texture)

        return current_texture

class PostProcessEffect:
    """Base class for post-processing effects"""
    def __init__(self, pipeline: PostProcessingPipeline) -> None:
        self.pipeline: PostProcessingPipeline = pipeline
        self.ctx: moderngl.Context = pipeline.ctx
        self.enabled: bool = True
        self.shader: Optional[moderngl.Program] = self.create_shader()

    def create_shader(self) -> Optional[moderngl.Program]:
        """Override to create effect shader"""
        pass

    def apply(self, input_texture: moderngl.Texture) -> Optional[moderngl.Texture]:
        """Apply effect to input texture"""
        pass

class BloomEffect(PostProcessEffect):
    """Bloom/glow effect"""
    def __init__(self, pipeline: PostProcessingPipeline) -> None:
        super().__init__(pipeline)
        self.threshold: float = 0.7
        self.intensity: float = 1.0
        self.radius: int = 4

    def create_shader(self) -> moderngl.Program:
        vertex = '''
        #version 330
        in vec2 in_position;
        in vec2 in_texcoord;
        out vec2 v_texcoord;

        void main() {
            v_texcoord = in_texcoord;
            gl_Position = vec4(in_position, 0.0, 1.0);
        }
        '''

        fragment = '''
        #version 330

        uniform sampler2D u_texture;
        uniform float u_threshold;
        uniform float u_intensity;
        uniform vec2 u_direction;

        in vec2 v_texcoord;
        out vec4 f_color;

        void main() {
            vec2 tex_offset = 1.0 / textureSize(u_texture, 0);
            vec3 result = texture(u_texture, v_texcoord).rgb * 0.227027;

            // Gaussian blur weights
            float weight[5] = float[](
                0.227027, 0.1945946, 0.1216216, 0.054054, 0.016216
            );

            // Extract bright pixels
            vec3 color = texture(u_texture, v_texcoord).rgb;
            float brightness = dot(color, vec3(0.2126, 0.7152, 0.0722));

            if(brightness > u_threshold) {
                // Two-pass Gaussian blur
                for(int i = 1; i < 5; ++i) {
                    vec2 offset = tex_offset * float(i) * u_direction;
                    result += texture(u_texture, v_texcoord + offset).rgb * weight[i];
                    result += texture(u_texture, v_texcoord - offset).rgb * weight[i];
                }

                result *= u_intensity;
            }

            f_color = vec4(color + result, 1.0);
        }
        '''

        return self.ctx.program(
            vertex_shader=vertex,
            fragment_shader=fragment
        )
Best Practices
⚡ Post-processing Tips
- Order Matters: Apply effects in the correct sequence
- HDR Pipeline: Use floating-point buffers for better quality
- Performance: Combine passes when possible
- Resolution Scaling: Render effects at lower resolution
- Temporal Effects: Use frame history for motion blur
- LUTs: Use lookup tables for color grading
- Artistic Control: Expose parameters to designers
- Platform Testing: Effects vary across hardware
Key Takeaways
- 🎨 Post-processing adds professional polish
- 🌟 Bloom creates atmospheric glow
- 💨 Motion blur conveys speed
- 📷 DOF adds cinematic depth
- 🎬 Color grading sets mood
- 📐 Anti-aliasing smooths edges
- 🔲 Vignetting focuses attention
- ⚡ Performance requires optimization
🏋️♂️ Practice Exercise
🏋️♂️ Exercise 1: Three Passes, One Ping-Pong — Selective-Bloom + Vignette + Tone-Mapping in One Pygame Window
Objective: Build a runnable pygame program (~95 lines) that distills the lesson's moderngl + GLSL fragment-shader post-processing pipeline into a 2D pygame demo so each architectural discipline is visible per frame. The window is 1088×480 split into a 768×480 scene of moving bright-and-dim colored circles on a dark background and a 320px sidebar. The scene is rendered to a source surface, then run through three orthogonal post-processing passes — bloom, vignette, tone-mapping/grade — using two reusable temporary ping / pong float32 numpy arrays alternating per-pass-write-target, the 2D analog of the lesson's `framebuffers.ping` / `framebuffers.pong` HDR framebuffer pair plus the explicit `process()` pipeline ordering that walks each enabled effect in sequence. Three orthogonal post-processing disciplines are visible per frame: (a) Pass-chain ping-pong architecture — each pass reads from one buffer and writes to the other (`pong = pass_bloom(ping, ...)` then `ping = pass_vignette(pong)` then `pong = pass_grade(ping)`), with the two buffers reused across all passes rather than allocating a fresh full-resolution buffer per pass. The lesson's `process()` method walks `for effect_name, effect in self.effects.items(): if effect.enabled: current_texture = effect.apply(current_texture)` exactly this shape — one current-texture handle that swings between the ping and pong attachment-points each pass. Pressing O swaps pass order (bloom-then-vignette-then-grade vs vignette-then-bloom-then-grade) and produces a visibly different final composite: bloom-then-vignette gives bright glow on the bright circles with the corners darkened by the radial vignette mask after the glow already contributed; vignette-then-bloom dims the bright circles below threshold BEFORE bloom runs at the corners, so the bright-pass mask finds nothing to glow on at the corner pixels — same three passes, same source frame, two different finals because the order of operations matters when each pass is non-commutative with the others. (b) Selective bloom via BT.709 luminance threshold — the lesson's exact `dot(color, vec3(0.2126, 0.7152, 0.0722))` perceptually-weighted brightness gate from the bloom fragment shader is implemented in numpy as `arr @ LUMA` per-pixel (with `LUMA = np.array([0.2126, 0.7152, 0.0722], dtype=np.float32)`), and only luminance > threshold pixels survive the gate to enter the blur stages — the rest are masked to black via `mask = (luma > t)[..., None]; bright = arr * mask`. The BT.709 weights are not arbitrary; they encode the human eye's perceptual sensitivity to each primary (green is brightest because the M-cone has the highest photopic luminous efficiency, blue is darkest because S-cones contribute least to brightness perception, red sits between), so the gate fires on perceptually-bright pixels rather than on pixels with high R+G+B sums that may not look bright (a saturated pure-blue pixel (0, 0, 255) has R+G+B sum of 255 but BT.709 luminance of only 18.4 — correctly identified as dim — while a saturated pure-green pixel (0, 255, 0) has the same sum but BT.709 luminance of 182.5 — correctly identified as bright). T raises the threshold (fewer pixels glow); Y lowers it (more pixels glow); the threshold value displayed in the sidebar makes the design knob directly observable. (c) Two-pass separable Gaussian blur as N+N vs N² algorithmic decomposition — the lesson's shader has a `u_horizontal == 1` / `u_horizontal == 0` branch that runs the SAME blur kernel along one axis at a time, processing horizontal-blur-into-temp then vertical-blur-of-temp instead of doing a single 2D N×N convolution per output pixel. This exploits the mathematical identity G_2D(x,y) = G_1D(x) · G_1D(y) — the 2D Gaussian kernel is the outer product of two 1D Gaussian kernels, so blurring once horizontally then once vertically produces the SAME mathematical result as one full 2D blur, but with N+N samples per pixel instead of N² samples. At radius 4 (2·4+1 = 9-tap kernel) that's 18 samples per pixel for the separable version vs 81 samples per pixel for the full 9×9 — about 4.5× fewer texture reads with identical visual output. The demo runs `bright = blur_axis(bright, 4, axis=1); bright = blur_axis(bright, 4, axis=0)` mirroring this two-call shape. The decomposition is correctness-preserving (not an approximation), and it scales asymptotically — at radius 8 it's 34 vs 289 samples (8.5× fewer), at radius 16 it's 66 vs 1089 samples (16.5× fewer) — which is why every production bloom implementation including Unreal's, Unity's, and the lesson's shader uses the separable two-pass form rather than a single N² convolution. The lightmap-multiplied-by-diffuse final composite from graphics_lighting is exactly what production post-processing pipelines feed into bloom/vignette/tone-mapping; same mathematical operator, different geometric interpretation).
Instructions:
- Set up the 1088×480 pygame window (768×480 scene + 320×480 sidebar) with a 60 FPS clock, a small monospace font for the sidebar HUD, and `import numpy as np` at module scope (numpy carries the per-pixel post-processing math because pure-Python loops over 768×480 = 368k pixels per frame would not maintain 60 FPS).
- Define `LUMA = np.array([0.2126, 0.7152, 0.0722], dtype=np.float32)` as the BT.709 perceptual-luminance weights used by the bloom threshold gate, plus mutable state for `thresh = 0.55` (bloom threshold, T/Y adjustable) and `swap = False` (pass-order toggle, O adjustable).
- Pre-compute a vignette mask once at startup as a (H, W, 1) float32 array using `np.mgrid` to generate per-pixel distance-from-center, normalize by the corner distance, then run smoothstep over the (0.35, 0.95) range to build the radial darkening factor (1.0 at center, 0.0 at corners) — this mask multiplies into the post-bloom array per pass, so doing it once at startup avoids ~370k smoothstep evaluations every frame.
- Define a small list of moving circles (3 bright: red / cyan / yellow at high RGB values that exceed the BT.709 threshold; 2 dim: dark navy / dark olive at low RGB values that fall below the threshold) with `pos`/`vel`/`radius`/`color` fields; each frame integrate position, bounce off scene boundaries, and clamp to the play area — the bright circles are what bloom will glow on, the dim circles are what bloom will leave alone (visible proof the threshold gate is selecting on perceptual luminance not just any pixel).
- Render the scene per frame: fill the source surface with a dark background (10, 12, 18) so dim circles are visibly dim against it, then draw all five circles at their current positions — this is the source surface that will enter the post-processing chain.
- Convert the source surface to a float32 numpy array via `pygame.surfarray.array3d(src).astype(np.float32).transpose(1, 0, 2) / 255.0` (transpose because pygame surfarray returns (W, H, 3) but numpy convention is (H, W, 3); divide by 255 to get the [0, 1] HDR-style float range the lesson's shaders work in). This is the `ping` array that enters the pass chain.
- Run the three passes via the ping-pong pattern, switching write-target each pass: by default `pong = pass_bloom(ping, thresh); ping = pass_vignette(pong); pong = pass_grade(ping)`; when `swap` is True instead `pong = pass_vignette(ping); ping = pass_bloom(pong, thresh); pong = pass_grade(ping)` — same three passes, different order, visibly different output. Each pass takes a (H, W, 3) float32 array and returns one of the same shape. `pass_bloom` masks by luma threshold then runs `blur_axis(bright, 4, axis=1)` followed by `blur_axis(bright, 4, axis=0)` (the two-pass separable Gaussian) and returns `arr + bright * intensity` (additive composite). `pass_vignette` returns `arr * VIG`. `pass_grade` runs a Reinhard-style tone map `arr / (arr + 0.5)` then a small saturation lift around BT.709 luminance.
- Convert the final array back to a surface via `pygame.image.frombuffer(np.clip(pong, 0, 1).__mul__(255).astype(np.uint8).tobytes(), (WORLD_W, WORLD_H), 'RGB')`, blit it to the screen, then render the sidebar HUD: keybinding hints, the live pass-order line (`bloom -> vignette -> grade` vs `vignette -> bloom -> grade`), the bloom threshold value, the BT.709 LUMA weights as concrete numbers (R 0.2126 / G 0.7152 / B 0.0722), the separable-blur sample-count comparison (radius 4: 18 samples vs 81 samples = 4.5× cheaper), and FPS. Press O and watch the final scene visibly change without re-rendering the source; press T/Y and watch the bloom selection tighten or widen.
💡 Hint
The numpy operations are the key efficiency move: a pure-Python double loop over 368k pixels per frame would take ~5 seconds, but vectorized numpy runs the same work in ~5 milliseconds because the per-pixel math compiles down to optimized C in the numpy backend. `arr @ LUMA` is the matrix-multiply-as-dot-product idiom that computes per-pixel BT.709 luminance in a single numpy call: arr is (H, W, 3), LUMA is (3,), and the `@` operator broadcasts over the leading two dimensions to produce an (H, W) per-pixel scalar luminance map — same operation as a triple nested for-loop, ~1000× faster. For the separable blur, `np.roll(arr, k, axis=1)` shifts the array k columns horizontally with wrap-around — looping `for r in range(-radius, radius+1): acc += np.roll(arr, r, axis=1)` then dividing by `2*radius+1` gives a box-blur approximation of the Gaussian (a true Gaussian needs proper kernel weights, but a box blur is a valid simplification that demonstrates the same separability identity and is a common production simplification for performance). The vignette mask is pre-computed once because the radial distance from center never changes across frames; recomputing it per frame would waste ~10ms per frame on work that has a static answer. For pygame.image.frombuffer the bytes order must be (H, W, 3) row-major (H rows of W pixels each, RGB triplets) — that's what numpy gives you natively from a (H, W, 3) array's .tobytes(), no extra transpose at the end. Use `pygame.surfarray.array3d` (returns a copy) rather than `pygame.surfarray.pixels3d` (returns a view that locks the surface) so the source surface stays drawable for the next frame.
✅ Example Solution
import math, pygame, numpy as np
pygame.init()

WORLD_W, WORLD_H, SIDE_W = 768, 480, 320
SCREEN_W = WORLD_W + SIDE_W
screen = pygame.display.set_mode((SCREEN_W, WORLD_H))
clock = pygame.time.Clock()
font = pygame.font.SysFont('consolas', 13)

# --- Lesson's GLSL bloom-threshold luma weights translated to numpy ---
LUMA = np.array([0.2126, 0.7152, 0.0722], dtype=np.float32)  # BT.709
thresh = 0.55
swap = False  # O toggles pass order

# Pre-compute vignette mask once (H, W, 1) using smoothstep on radial distance
def make_vig(w: int, h: int) -> np.ndarray:
    cx, cy = w / 2.0, h / 2.0
    maxd = math.hypot(cx, cy)
    ys, xs = np.mgrid[0:h, 0:w].astype(np.float32)
    d = np.sqrt((xs - cx) ** 2 + (ys - cy) ** 2) / maxd
    t = np.clip((d - 0.35) / 0.6, 0.0, 1.0)
    smooth = 1.0 - t * t * (3.0 - 2.0 * t)        # smoothstep falloff
    return smooth[..., None].astype(np.float32)

VIG = make_vig(WORLD_W, WORLD_H)

# 3 bright circles (above luma threshold) + 2 dim (below) prove selective bloom
circles = [
    {'p': pygame.Vector2(180, 200), 'v': pygame.Vector2( 80,  60), 'r': 32, 'c': (255,  80,  60)},
    {'p': pygame.Vector2(420, 280), 'v': pygame.Vector2(-60,  90), 'r': 28, 'c': ( 60, 200, 255)},
    {'p': pygame.Vector2(560, 150), 'v': pygame.Vector2( 70, -50), 'r': 24, 'c': (255, 230, 100)},
    {'p': pygame.Vector2(300, 400), 'v': pygame.Vector2(-90, -70), 'r': 36, 'c': ( 60,  60,  80)},
    {'p': pygame.Vector2(620, 380), 'v': pygame.Vector2( 50, -80), 'r': 22, 'c': ( 80,  70,  60)},
]

# Box-blur approximation of Gaussian via np.roll, separable per axis
def blur_axis(arr: np.ndarray, radius: int, axis: int) -> np.ndarray:
    n = 2 * radius + 1
    acc = np.zeros_like(arr)
    for r in range(-radius, radius + 1):
        acc += np.roll(arr, r, axis=axis)
    return acc / n

# Pass functions: each takes float32 (H, W, 3) in [0, 1] and returns same shape
def pass_bloom(arr: np.ndarray, t: float) -> np.ndarray:
    luma = arr @ LUMA                              # BT.709 per-pixel luminance
    mask = (luma > t).astype(np.float32)[..., None] # selective threshold gate
    bright = arr * mask                            # only bright pixels survive
    bright = blur_axis(bright, 4, axis=1)          # horizontal blur (1st pass)
    bright = blur_axis(bright, 4, axis=0)          # vertical   blur (2nd pass)
    return arr + bright * 1.6                      # additive composite

def pass_vignette(arr: np.ndarray) -> np.ndarray:
    return arr * VIG

def pass_grade(arr: np.ndarray) -> np.ndarray:
    tm = arr / (arr + 0.5)                         # Reinhard tone-map
    gray = (tm @ LUMA)[..., None]
    return gray + (tm - gray) * 1.2                # mild saturation lift

running = True
while running:
    dt = clock.tick(60) / 1000.0
    for ev in pygame.event.get():
        if ev.type == pygame.QUIT: running = False
        if ev.type == pygame.KEYDOWN:
            if ev.key == pygame.K_o: swap = not swap
            if ev.key == pygame.K_t: thresh = min(0.95, thresh + 0.05)
            if ev.key == pygame.K_y: thresh = max(0.05, thresh - 0.05)

    # Render source scene to a pygame surface
    src = pygame.Surface((WORLD_W, WORLD_H))
    src.fill((10, 12, 18))
    for c in circles:
        c['p'] += c['v'] * dt
        if c['p'].x < c['r'] or c['p'].x > WORLD_W - c['r']: c['v'].x *= -1
        if c['p'].y < c['r'] or c['p'].y > WORLD_H - c['r']: c['v'].y *= -1
        c['p'].x = max(c['r'], min(WORLD_W - c['r'], c['p'].x))
        c['p'].y = max(c['r'], min(WORLD_H - c['r'], c['p'].y))
        pygame.draw.circle(src, c['c'], (int(c['p'].x), int(c['p'].y)), c['r'])

    # Surface -> float32 (H, W, 3) ping array, then run 3 passes ping-pong
    ping = pygame.surfarray.array3d(src).astype(np.float32).transpose(1, 0, 2) / 255.0
    if not swap:
        pong = pass_bloom(ping, thresh)        # ping -> pong
        ping = pass_vignette(pong)             # pong -> ping
        pong = pass_grade(ping)                # ping -> pong
    else:
        pong = pass_vignette(ping)             # ping -> pong
        ping = pass_bloom(pong, thresh)        # pong -> ping
        pong = pass_grade(ping)                # ping -> pong

    # Float (H, W, 3) -> bytes -> pygame surface (no end transpose needed)
    out8 = (np.clip(pong, 0.0, 1.0) * 255).astype(np.uint8)
    final = pygame.image.frombuffer(out8.tobytes(), (WORLD_W, WORLD_H), 'RGB')

    screen.blit(final, (0, 0))
    pygame.draw.rect(screen, (25, 28, 36), (WORLD_W, 0, SIDE_W, WORLD_H))
    order = 'vignette -> bloom -> grade' if swap else 'bloom -> vignette -> grade'
    lines = [
        'O      swap pass order',
        'T / Y  raise / lower bloom threshold',
        '',
        'Pass order:',
        '  ' + order,
        '',
        'Bloom threshold (BT.709 luma): %.2f' % thresh,
        '',
        'BT.709 luma weights:',
        '  R 0.2126   G 0.7152   B 0.0722',
        '',
        'Separable blur (radius 4):',
        '  2-pass H+V = 18 samples / px',
        '  full 9x9   = 81 samples / px',
        '  -> 4.5x cheaper, same result',
        '',
        'FPS: %d' % int(clock.get_fps()),
    ]
    for i, line in enumerate(lines):
        screen.blit(font.render(line, True, (220, 225, 235)), (WORLD_W + 16, 16 + i * 18))
    pygame.display.flip()

pygame.quit()
🎯 Quick Quiz
Question 1: The lesson's `PostProcessingPipeline.init_pipeline()` allocates exactly two non-scene framebuffers named `ping` and `pong`, and `process()` walks each enabled effect via `current_texture = effect.apply(current_texture)` so the same handle swings between the two attachments across passes. The 2D pygame demo mirrors this with two reusable float32 numpy arrays alternating as the write-target across `pass_bloom` → `pass_vignette` → `pass_grade`, and pressing O swaps the order of bloom and vignette to produce a visibly different final composite. Which statement most accurately describes WHY the lesson uses a ping-pong pair (not three or N-many fresh buffers per pass) AND why the order in which passes run actually changes the visible output?
Question 2: The lesson's bloom fragment shader contains the line `float brightness = dot(color, vec3(0.2126, 0.7152, 0.0722));` then gates blur work behind `if(brightness > u_threshold)`. The 2D pygame demo mirrors this with `LUMA = np.array([0.2126, 0.7152, 0.0722], dtype=np.float32)` and `luma = arr @ LUMA; mask = (luma > t)[..., None]; bright = arr * mask`. Which statement most accurately describes WHY these specific weights are used (rather than equal R+G+B averaging, or arbitrary tunable per-engine constants)?
Question 3: The lesson's bloom shader runs the SAME blur kernel through a `u_horizontal == 1` / `u_horizontal == 0` shader-uniform branch — first horizontally, then vertically — over two separate fragment-shader invocations rather than one pass with a single 2D N×N convolution per output pixel. The 2D pygame demo mirrors this with `bright = blur_axis(bright, 4, axis=1); bright = blur_axis(bright, 4, axis=0)` running the same axis-aligned blur twice. Which statement most accurately describes WHY production bloom implementations use this two-pass separable form rather than a single 2D convolution?
What's Next?
Now that you understand post-processing effects, next we'll explore UI/HUD development for creating polished game interfaces!